ECDSA
Elliptic Curve Digital Signature Algorithm
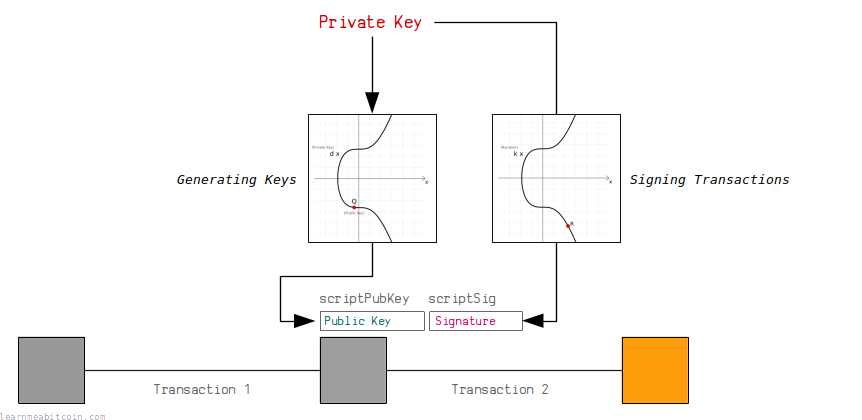
Bitcoin uses a digital signature system called ECDSA to control the ownership of bitcoins.
In short, a digital signature system allows you to generate your own private/public key pair. You can then use the private key to generate signatures that prove you are the owner of the public key, without having to reveal the private key.
This system is used in Bitcoin to allow people to receive and send bitcoins in transactions.
Anyone can generate their own pair of keys, and then anyone can send (or "lock") an output to your public key. Nobody can steal these bitcoins, because only the person with the correct private key for this public key is able to generate valid signatures to "unlock" the bitcoins and use them as an input in a future transaction.
I don't know enough about cryptography to explain why ECDSA works, but I can show you how ECDSA works.
Full ECDSA Code

 copied
 copied
require "digest" # for hashing transaction data so we can sign it
require "securerandom" # for generating random nonces when signing
# -------------------------
# Elliptic Curve Parameters
# -------------------------
# y² = x³ + ax + b
$a = 0
$b = 7
# prime field
$p = 115792089237316195423570985008687907853269984665640564039457584007908834671663 #=> 2**256 - 2**32 - 2**9 - 2**8 - 2**7 - 2**6 - 2**4 - 1
# number of points on the curve we can hit ("order")
$n = 115792089237316195423570985008687907852837564279074904382605163141518161494337
# generator point (the starting point on the curve used for all calculations)
$G = {
x: 55066263022277343669578718895168534326250603453777594175500187360389116729240,
y: 32670510020758816978083085130507043184471273380659243275938904335757337482424,
}
# ---------------
# Modular Inverse: Ruby doesn't have a built-in modinv function
# ---------------
def inverse(a, m = $p)
# store original modulus
m_orig = m
# make sure a is positive
if a < 0
a = a % m
end
# set initial values before loop
y_prev = 0
y = 1
while a > 1
q = m / a
y_before = y # store current value of y
y = y_prev - q * y # calculate new value of y
y_prev = y_before # set previous y value to the old y value
a_before = a # store current value of a
a = m % a # calculate new value of a
m = a_before # set m to the old a value
end
return y % m_orig
end
# ------
# Double: add a point to itself
# ------
def double(point)
# slope = (3x₁² + a) / 2y₁
slope = ((3 * point[:x] ** 2 + $a) * inverse((2 * point[:y]), $p)) % $p # using inverse to help with division
# x = slope² - 2x₁
x = (slope ** 2 - (2 * point[:x])) % $p
# y = slope * (x₁ - x) - y₁
y = (slope * (point[:x] - x) - point[:y]) % $p
# Return the new point
return { x: x, y: y }
end
# ---
# Add: add two points together
# ---
def add(point1, point2)
# double if both points are the same
if point1 == point2
return double(point1)
end
# slope = (y₁ - y₂) / (x₁ - x₂)
slope = ((point1[:y] - point2[:y]) * inverse(point1[:x] - point2[:x], $p)) % $p
# x = slope² - x₁ - x₂
x = (slope ** 2 - point1[:x] - point2[:x]) % $p
# y = slope * (x₁ - x) - y₁
y = ((slope * (point1[:x] - x)) - point1[:y]) % $p
# Return the new point
return { x: x, y: y }
end
# --------
# Multiply: use double and add operations to quickly multiply a point by an integer value (i.e. a private key)
# --------
def multiply(k, point = $G)
# create a copy the initial starting point (for use in addition later on)
current = point
# convert integer to binary representation
binary = k.to_s(2)
# double and add algorithm for fast multiplication
binary.split("").drop(1).each do |char| # from left to right, ignoring first binary character
# 0 = double
current = double(current)
# 1 = double and add
current = add(current, point) if char == "1"
end
# return the final point
current
end
# ----
# Sign
# ----
def sign(private_key, hash, nonce = nil)
# generate random number if not given
if nonce == nil
loop do
nonce = SecureRandom.hex(32).to_i(16)
break if nonce < $n # make sure random number is below the number of points of the curve
end
end
# r = the x value of a random point on the curve
r = multiply(nonce)[:x] % $n
# s = nonce⁻¹ * (hash + private_key * r) mod n
s = (inverse(nonce, $n) * (hash + private_key * r)) % $n # this breaks linearity (compared to schnorr)
# signature is [r, s]
return { r: r, s: s }
end
# ------
# Verify
# ------
def verify(public_key, signature, hash)
# point 1
point1 = multiply(inverse(signature[:s], $n) * hash)
# point 2
point2 = multiply((inverse(signature[:s], $n) * signature[:r]), public_key)
# add two points together
point3 = add(point1, point2)
# check x coordinate of this point matches the x-coordinate of the random point given
return point3[:x] % $n == signature[:r] # need to mod the x-coordinate with $n first
end
# -------------------
# Create A Public Key
# -------------------
# Example private key (in hexadecimal)
private_key = "f94a840f1e1a901843a75dd07ffcc5c84478dc4f987797474c9393ac53ab55e6"
# Public key is the generator point multiplied by the private key
point = multiply(private_key.to_i(16))
# convert x and y values of the public key point to hexadecimal
x = point[:x].to_s(16).rjust(64, "0") # pad with zeros to make sure it's 64 characters (32 bytes)
y = point[:y].to_s(16).rjust(64, "0")
# uncompressed public key (use full x and y coordinates) OLD FORMAT!
public_key_uncompressed = "04" + x + y
# compressed public key (use a prefix to indicate whether y is even or odd)
if (point[:y] % 2 == 0)
public_key_compressed = "02" + x # y is even
else
public_key_compressed = "03" + x # y is odd
end
#puts public_key_compressed #=> 024aeaf55040fa16de37303d13ca1dde85f4ca9baa36e2963a27a1c0c1165fe2b1
# ------------------
# Sign A Transaction
# ------------------
# A basic structure for holding the transaction data
def tx(scriptsig)
# Need to calculate a byte indicating the size of upcoming scriptsig in bytes (rough code but does the job)
size = (scriptsig.length / 2).to_s(16).rjust(2, "0")
# Raw unsigned transaction data with the scriptsig field (you need to know the correct position)
return "0100000001b7994a0db2f373a29227e1d90da883c6ce1cb0dd2d6812e4558041ebbbcfa54b00000000#{size}#{scriptsig}ffffffff01983a0000000000001976a914b3e2819b6262e0b1f19fc7229d75677f347c91ac88ac00000000"
end
# Private key and public key for the locked up bitcoins we want to spend
private_key = "f94a840f1e1a901843a75dd07ffcc5c84478dc4f987797474c9393ac53ab55e6" # sha256("learnmeabitcoin1")
public_key = "024aeaf55040fa16de37303d13ca1dde85f4ca9baa36e2963a27a1c0c1165fe2b1"
# NOTE: Need to remove all existing signatures from the transaction data first if there are any
# Put original scriptpubkey as a placeholder in to the scriptsig for the input you want to sign (required)
scriptpubkey = "76a9144299ff317fcd12ef19047df66d72454691797bfc88ac" # just one input in this transaction
transaction = tx(scriptpubkey)
# Append sighash type to transaction data (required)
transaction = transaction + "01000000"
# Get a hash of the transaction data (because we sign the hash of data and not the actual data itself)
hash = Digest::SHA256.hexdigest(Digest::SHA256.digest([transaction].pack("H*")))
# Use elliptic curve mathematics to sign the hash using the private key and nonce
signature = sign(private_key.to_i(16), hash.to_i(16), 123456789) # using a fixed nonce for testing (unsafe)
# Use the low s value (BIP 62: Dealing with malleability)
if (signature[:s] > $n / 2)
signature[:s] = $n - signature[:s]
end
# Encode the signature in to DER format (slightly awkward format used for signatures in bitcoin transactions)
r = signature[:r].to_s(16).rjust(64, "0") # convert r to hexadecimal
s = signature[:s].to_s(16).rjust(64, "0") # convert s to hexadecimal
r = "00" + r if (r[0, 2].to_i(16) >= 0x80) # prepend 00 if first byte is 0x80 or above (DER quirk)
s = "00" + r if (s[0, 2].to_i(16) >= 0x80) # prepend 00 if first byte is 0x80 or above (DER quirk)
der = "" # string for holding our der encoding
r_len = (r.length / 2).to_s(16).rjust(2, "0") # get length of r (in bytes)
s_len = (s.length / 2).to_s(16).rjust(2, "0") # get length of s (in bytes)
der << "02" << r_len << r << "02" << s_len << s # Add to DER encoding (0x20 byte indicates an integer type in DER)
der_len = (der.length / 2).to_s(16).rjust(2, "0") # get length of DER data (in bytes)
der = "30" + der_len + der # Final DER encoding (0x30 byte indicates compound object type)
# Append sighashtype to the signature (required) (01 = ALL)
der = der + "01" # without it you get "mandatory-script-verify-flag-failed (Non-canonical DER signature) (code 16)"
# Construct full unlocking script (P2PKH scripts need original public key the bitcoins were locked to): <size> {signature} <size> {public_key}
scriptsig = (der.length / 2).to_s(16) + der + (public_key.length / 2).to_s(16) + public_key
# Put the full scriptsig in to the original transaction data
transaction = tx(scriptsig)
# Show the signed transaction
puts transaction #=> 0100000001b7994a0db2f373a29227e1d90da883c6ce1cb0dd2d6812e4558041ebbbcfa54b000000006a473044022008f4f37e2d8f74e18c1b8fde2374d5f28402fb8ab7fd1cc5b786aa40851a70cb02201f40afd1627798ee8529095ca4b205498032315240ac322c9d8ff0f205a93a580121024aeaf55040fa16de37303d13ca1dde85f4ca9baa36e2963a27a1c0c1165fe2b1ffffffff01983a0000000000001976a914b3e2819b6262e0b1f19fc7229d75677f347c91ac88ac00000000
# Send the transaction in to the bitcoin network
# $ bitcoin-cli sendrawtransaction [raw transaction data]
Elliptic Curves
The mathematical backbone of ECDSA
ECDSA uses the elliptic curve as the basis for a digital signature system.
In summary, public keys and signatures are just points on an elliptic curve. If both of these points are created from the same private key (a large number), there will be a geometric connection between them that proves that the person who created the signature also created (or "owns") the public key too.
I'm not going to cover the mathematics of elliptic curves here, but all we need to use ECDSA in Bitcoin is to be able to multiply a point on the elliptic curve.
In short, "multiplication" on the elliptic curve basically means taking a starting point on the curve, and bouncing around it a certain number of times to end up at a new point of the curve. The special property of this "multiplication" operation is that it's not possible to "go backwards", which is why the elliptic curve is used for cryptographic systems such as digital signatures.
Anyway, here's the code for performing elliptic curve multiplication (using the parameters for the Secp256k1 curve used in Bitcoin):
Secp256k1 Parameters
copiedcopied# y² = x³ + ax + b
$a = 0
$b = 7

# prime field
$p = 115792089237316195423570985008687907853269984665640564039457584007908834671663 #=> 2**256 - 2**32 - 2**9 - 2**8 - 2**7 - 2**6 - 2**4 - 1

# number of points on the curve we can hit ("order")
$n = 115792089237316195423570985008687907852837564279074904382605163141518161494337

# generator point (the starting point on the curve used for all calculations)
$G = {
  x: 55066263022277343669578718895168534326250603453777594175500187360389116729240,
  y: 32670510020758816978083085130507043184471273380659243275938904335757337482424,
}
Elliptic Curve Mathematics
copiedcopieddef inverse(a, m = $p)

  # store original modulus
  m_orig = m

  # make sure a is positive
  if a < 0
    a = a % m
  end

  # set initial values before loop
  y_prev = 0
  y = 1

  while a > 1
    q = m / a

    y_before = y # store current value of y
    y = y_prev - q * y # calculate new value of y
    y_prev = y_before # set previous y value to the old y value

    a_before = a # store current value of a
    a = m % a # calculate new value of a
    m = a_before # set m to the old a value
  end

  return y % m_orig
end

def add(point1, point2)
  # double if both points are the same
  if point1 == point2
    return double(point1)
  end

  # slope = (y₁ - y₂) / (x₁ - x₂)
  slope = ((point1[:y] - point2[:y]) * inverse(point1[:x] - point2[:x], $p)) % $p

  # x = slope² - x₁ - x₂
  x = (slope ** 2 - point1[:x] - point2[:x]) % $p

  # y = slope * (x₁ - x) - y₁
  y = ((slope * (point1[:x] - x)) - point1[:y]) % $p

  # Return the new point
  return { x: x, y: y }
end

def double(point)
  # slope = (3x₁² + a) / 2y₁
  slope = ((3 * point[:x] ** 2 + $a) * inverse((2 * point[:y]), $p)) % $p # using inverse to help with division

  # x = slope² - 2x₁
  x = (slope ** 2 - (2 * point[:x])) % $p

  # y = slope * (x₁ - x) - y₁
  y = (slope * (point[:x] - x) - point[:y]) % $p

  # Return the new point
  return { x: x, y: y }
end

def multiply(k, point = $G)
  # create a copy the initial starting point (for use in addition later on)
  current = point

  # convert integer to binary representation
  binary = k.to_s(2)

  # double and add algorithm for fast multiplication
  binary.split("").drop(1).each do |char| # from left to right, ignoring first binary character
    # 0 = double
    current = double(current)

    # 1 = double and add
    current = add(current, point) if char == "1"
  end

  # return the final point
  current
end
Usage
How do you create digital signatures using ECDSA?
Now that we know how to multiply a point on an elliptic curve, we can use this as the basis for a system for creating digital signatures.
The following system is called the Elliptic Curve Digital Signature Algorithm, or ECDSA for short.
Key Generation
We create pairs of keys using elliptic curve multiplication:
- private key (
d) — A large randomly-generated number between 0 and the number of points on the curve ([0...n-1]) - public key (
Q) — The generator point (G) multiplied by the private key (d).
d is the private key (an integer)G is the generator point (a point)Q is the public key (a point)
So in elliptic curve cryptography, a private key is just a large random integer (less than the number of points on the curve), and its corresponding public key is just a point on the curve.
For example:
private key = 112757557418114203588093402336452206775565751179231977388358956335153294300646
public key  = {
    x: 33886286099813419182054595252042348742146950914608322024530631065951421850289,
    y: 9529752953487881233694078263953407116222499632359298014255097182349749987176
}
Trapdoor Function
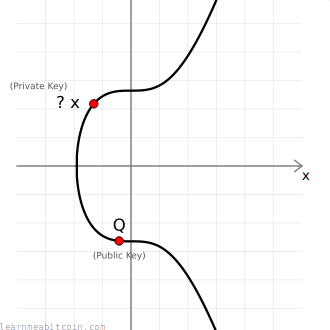
Given a public key point Q, there's no easy way to work out the private key d used to create it.
The only way to work out the private key would be to manually multiply the generator point G by different numbers to see if you can get the same public key, and this brute-force approach is going to be impossibly slow if someone has used a very large number for their private key.
Therefore, elliptic curve multiplication is known as a trapdoor function (because it's easy to go one way but difficult to go the other), which is a key component of all public key cryptography.
Furthermore, the one-way mathematical connection between the private key and public key means that you can use both independently to calculate the same points on the elliptic curve later on, which comes in very handy when constructing a system for creating digital signatures.
Sign
To sign a message you need three things:
- Random Number (
k) — This introduces an element of randomness in to our signatures, which is important for security. It means that every signature we generate will be different, even if we sign the same message twice. - Message Hash (
z) — This is the hash of the message we want to sign. Hashing the message gives us a small and unique fingerprint for it, and it's more efficient to sign this fingerprint than it is to sign a large blob of data. You have a choice of which hash algorithm to use, but the one most commonly used with secp256k1 is SHA-256. - Private Key (
d) — The source of a public key (that we've made publicly available).
An actual signature is then made of two parts:
r— A random point on the curve. We take the random numberkand multiply it by the generator point to get a random pointR. We only actually use the x-coordinate of this point, and we call this lowercaser.s— A number to accompany the random point. This is a unique number created from a combination of the message hashzand private keyd, which is also bound to the random point usingr.

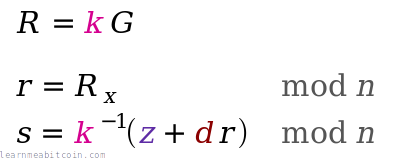
The ⁻¹ notation indicates the modular inverse of that number. Here the modular multiplicative inverse is found mod n (the number of points on the curve).
These two [r, s] values are the "digital signature".
For example:
random number   (k): 12345
message:             ECDSA is the most fun I have ever experienced
sha256(message) (z): 103318048148376957923607078689899464500752411597387986125144636642406244063093
private key     (d): 112757557418114203588093402336452206775565751179231977388358956335153294300646

random point (k*G = R): {
  x = 108607064596551879580190606910245687803607295064141551927605737287325610911759,
  y = 6661302038839728943522144359728938428925407345457796456954441906546235843221
}
signature: r = R[x], s = k⁻¹ * (z + r * d): {
  r = 108607064596551879580190606910245687803607295064141551927605737287325610911759,
  s = 73791001770378044883749956175832052998232581925633570497458784569540878807131
}
Nonce: A random number in cryptography is sometimes called a "nonce", which is short for "number used once".
In short, the unique s value provides a pathway for getting to the randomly-generated point r.
You can give these two pieces of information to someone else, and starting from the public key point Q they can use the s value to help them get to the random point r. The trick here is that only the person with the corresponding private key d could create a valid pathway to this random point provided by s.
This pathway also has the message hash z encoded in to it, which is what effectively allows us to create signatures for messages; nobody can create the pathways from the public key to a random point on the curve via the message hash without knowing the private key it was created from.
ECDSA Sign
copiedcopieddef sign(private_key, hash, nonce = nil)
  # generate random number if not given
  if nonce == nil
    loop do
      nonce = SecureRandom.hex(32).to_i(16)
      break if nonce < $n # make sure random number is below the number of points of the curve
    end
  end

  # r = the x value of a random point on the curve
  r = multiply(nonce)[:x] % $n

  # s = nonce⁻¹ * (hash + private_key * r) mod n
  s = (inverse(nonce, $n) * (hash + private_key * r)) % $n # this breaks linearity (compared to schnorr)

  # signature is [r, s]
  return { r: r, s: s }
end
Private Key Recovery
If you use the same random point (i.e. the same value for k) for more than one signature, anyone can work out your private key.
For example, lets say we're given two signed messages that were generated using the same value for k.
For each signed message we have the message hash z, and also the r and s values from each of the respective signatures:
Signed Message 1: (z₁, r₁, s₁)
Signed Message 2: (z₂, r₂, s₂)
However, because the same value for k was used each time to generate the random point (R = k*G), the r value (x-coordinate of R) in each of these signatures will also be the same:
Signed Message 1: (z₁, r, s₁)
Signed Message 2: (z₂, r, s₂)
So how can we use this information to work out the private key d?
First of all, we know that the s value in each of these signatures was calculated using s = k⁻¹(z + r * d) mod n, so:
s₁ = k⁻¹(z₁ + r * d) mod n
s₂ = k⁻¹(z₂ + r * d) mod n
And thanks to the fact that both equations now have the same value for k, we can solve them as a pair of simultaneous equations to work out the value for k.
To do this, we start by rearranging the second equation to get r * d on its own:
s₂ = k⁻¹(z₂ + r * d) mod n
r * d = k * s₂ - z₂ mod n
Then we can substitute this into the first equation, and rearrange it to get k:
s₁ = k⁻¹(z₁ + r * d) mod n
s₁ = k⁻¹(z₁ + (k * s₂ - z₂)) mod n
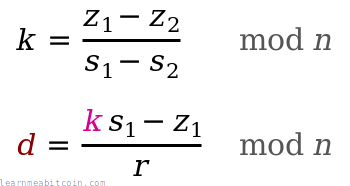
k = (z₁ - z₂) * (s₁ - s₂)⁻¹ mod n
Remember that multiplying by (s₁ - s₂)⁻¹ means multiplying by the modular multiplicative inverse of (s₁ - s₂), which is the same thing as "division" in elliptic curve mathematics.
And after we've worked out k, we can use it in s = k⁻¹(z + r * d) mod n again to work out d.
So rearranging the first equation (you can use either) to get d on its own:
s₁ = k⁻¹(z₁ + r * d) mod n
d = (k * s₁ - z₁) * r⁻¹ mod n
And because we already knew (z₁, r, s₁) and have just worked out k, we can plug them all in to this equation to work out the private key d.
In mathematical notation, the private key recovery looks like this:
So make sure you always use securely random values for k each time you create a signature. If someone spots you've used the same r value when signing different messages for the same public key, it only takes milliseconds for them to recover your private key.
In 2011 hackers worked out how to get the private key for the PS3 because Sony were using the same value for k when generating their signatures.
Here's an example of recovering a private key from two signatures using the same k in Ruby:
copiedcopiedrequire 'digest' # used for hashing messages before signing

# Note: This code uses the previously defined inverse(), double(), add(), multiply(), and sign() functions

# -------------
# Sign Messages
# -------------

# 0. Keys
prv = 1111222233334444555566667777888899990000 # any old private key
pub = multiply(prv)

# 1. Create first signed message
k    = 800000
z1   = Digest::SHA256.hexdigest("Just a simple message.").to_i(16)
sig1 = sign(prv, z1, k)

# 2. Create second signed message
k    = 800000 # Using the same value for k!
z2   = Digest::SHA256.hexdigest("I have used the same k value.").to_i(16)
sig2 = sign(prv, z2, k)

# --------------------
# Private Key Recovery
# --------------------
# k = (z₁ - z₂) * (s1 - s₂)⁻¹  mod n
# d = (k * s₁ - z₁) * r⁻¹    mod n

# 1. Work out k (note: result may be the additive inverse of original k, but it still works fine)
k_calculated = ((z1 - z2) * inverse(sig1[:s] - sig2[:s], $n)) % $n

# 2. Work out d (the original private key)
d_calculated = ((k_calculated * sig1[:s] - z1) * inverse(sig1[:r], $n)) % $n
puts d_calculated #=> 1111222233334444555566667777888899990000
Verify
You can verify a message and its signature with three things:
- Public Key
Q— This is the public key for the person claiming to have created the signature. - Message — The data that was signed. We can hash it ourselves to get the message hash
z. - Signature
[r, s]— This is the signature created for the above message, allegedly created by the person who has the private key for the public key.
We then use these three pieces of data to calculate two points on the curve:
- Point 1. Start with the generator point
G, and multiply it byinverse(s) * z. - Point 2. Start with the public key point
Q, and multiply it byinverse(s) * r.
We can now add these points together to give us Point 3:

If Point 3 matches up with the random point, the signature is valid.
For example:
message:             ECDSA is the most fun I have ever experienced
sha256(message) (z): 103318048148376957923607078689899464500752411597387986125144636642406244063093
signature (r,s): {
  r = 108607064596551879580190606910245687803607295064141551927605737287325610911759,
  s = 73791001770378044883749956175832052998232581925633570497458784569540878807131
}
public key (Q): {
  x = 33886286099813419182054595252042348742146950914608322024530631065951421850289,
  y = 9529752953487881233694078263953407116222499632359298014255097182349749987176
}

verification (s⁻¹ * z)G + (s⁻¹ * r)Q: {
  x = 108607064596551879580190606910245687803607295064141551927605737287325610911759, <- matches r (x-coordinate of random point)
  y = 6661302038839728943522144359728938428925407345457796456954441906546235843221
}In other words, the signature for this message could only have been created by the person who has the actual private key that the public key was created from. Nobody else can give you an s value that you can use in combination with the public key Q to reach the random point R unless they knew the private key d for that public key.
If you change the contents of the signed message or try to use the signature with a different public key, the resulting third point won't match up with the random point given in the signature, and the signature verification will fail.
ECDSA Verify
copiedcopieddef verify(public_key, signature, hash)
  # point 1
  point1 = multiply(inverse(signature[:s], $n) * hash)

  # point 2
  point2 = multiply((inverse(signature[:s], $n) * signature[:r]), public_key)

  # add two points together
  point3 = add(point1, point2)

  # check x coordinate of this point matches the x-coordinate of the random point given
  return point3[:x] % $n == signature[:r] # need to mod the x-coordinate with $n first
end
Why does this work? (Mathematics)
Signing:
The person creating a signature starts by using a random number k to generate a random point on the curve:
R = k * G
They then compute an auxiliary number using their private key d and the hash of the message z (along with r (the x-coordinate of R) and the random number k):
s = k⁻¹ * (z + r * d)
Verifying:
The following equation allows you to calculate the same point by using the public key Q alongside the hash of the message z and the given s value:
R = (s⁻¹ * z)G + (s⁻¹ * r)Q
We can now rearrange this equation and substitute some values to prove that this equation does indeed get us to the same point.
To start with, the public key Q is d * G, so:
R = (s⁻¹ * z)G + (s⁻¹ * r)d*G
If we rearrange this equation we get:
R = (s⁻¹ * z)G + (s⁻¹ * r * d)G
R = s⁻¹ * (z + r * d) * G
Now, remember that s = k⁻¹ * (z + r * d). If we rearrange this to get k on its own we get k = s⁻¹ * (z + r * d), and substituting this into the equation above:
R = k * G
And that's the same calculation that was used to generate the random point in the first place.
Summary
The best way to get the hang of ECDSA is to try coding it yourself.
The hardest part is not usually the elliptic curve mathematics, but actually preparing and formatting the resulting signatures for use inside bitcoin transactions later on. Also, it's not always easy to work with big numbers in some programming languages, so you may need to use special functions to perform the elliptic curve operations.
Other than that, the code is not as difficult as you may have initially thought.
Of course, I wouldn't recommend using this code in your most recent mission-critical system, but it should help you get started with creating your own public keys and signing your own transactions in Bitcoin without using an ECDSA library, should you want to.
Have fun.
It wasn't necessary for Satoshi Nakamoto to know the details of how digital signature systems work to be able to create Bitcoin. All they needed to know was that it does work, and that they could use it as the mechanism for sending and receiving money in the system they were building. The first version of Bitcoin actually used the OpenSSL library to provide the functionality for creating and verifying digital signatures, so it's not something they coded by hand themselves.
Resources
References:
- NIST.FIPS.186-4.pdf - Official Digital Signature Standard by NIST. Contains outlines for DSA, RSA, and ECDSA.
- sec2-v2.pdf - List of recommended curves for use in elliptic curve cryptography from SECG. Contains parameters for the
secp256k1curve used in Bitcoin.
Explanations:
- How The ECDSA Algorithm Works - Concise explanation of ECDSA.
- Recovering private key from Secp256k1 signatures - Succinct mathematical explanation by Thomas Pornin on how to recover a private key if someone has used the same random point for their signatures more than once.
Code
Here are some implementations of ECDSA in different programming languages that I found helpful: