01000000019d7a3553c3faec3d88d18b36ec3bfcdf00c7639ea161205a02e7fc9a1a25b61d0100000049483045022100c219a522e65ca8500ebe05a70d5a49d840ccc15f2afa4ee9df783f06b2a322310220489a46c37feb33f52c586da25c70113b8eea41216440eb84771cb67a67fdb68c01ffffffff0200f2052a010000001976a914e32acf8e6718a32029dc395cca1e0ac45c33f14188ac00c817a8040000004341049464205950188c29d377eebca6535e0f3699ce4069ecd77ffebfbd0bcf95e3c134cb7d2742d800a12df41413a09ef87a80516353a2f0a280547bb5512dc03da8ac00000000Signature
Proof that you own a public key
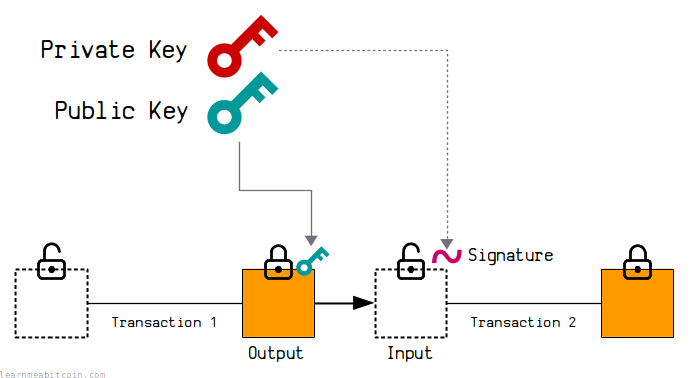
A signature is used to prove that you are the owner of a public key.
It's used inside transactions to unlock outputs that have been locked to a public key.
A signature is created using the private key that that was used to create the public key. The signature therefore has a unique mathematical connection to the public key, which is enough to prove that you are the "owner" of the public key without having to reveal the original private key.
Creating
How do you sign a bitcoin transaction?
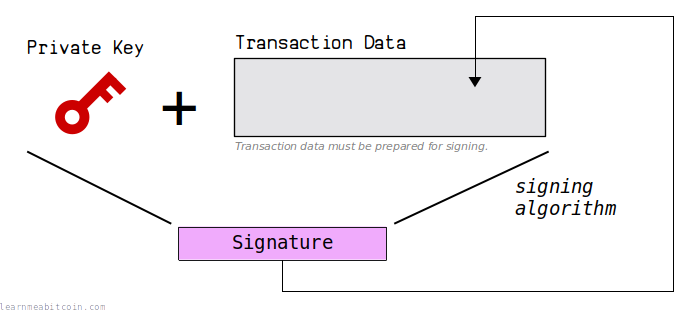
To create a signature, you need to sign a message using your private key.
In Bitcoin, this message is the transaction data containing the input that you want to unlock.
The basics steps for signing a transaction are:
- Construct the transaction. This will be the message that we sign.
- Use your private key to sign the transaction.
- Put the signature back inside the transaction.
Repeat these steps for every input you want to sign.
However, before we can create the signature, we need to prepare the transaction data ready for signing.
There are three different methods for signing a transaction, and the "signing algorithm" you use depends on the type of locking script on the output you want to spend:
- Legacy Algorithm – Used for unlocking legacy outputs, such as: P2PK, P2PKH, P2MS, and P2SH.
- Segwit Algorithm – Used for unlocking P2WPKH and P2WSH outputs only.
- Taproot Algorithm – Used for unlocking P2TR outputs only.
Legacy Algorithm
The legacy signing algorithm is used to create signatures that will unlock non-segwit locking scripts, such as: P2PK, P2PKH, P2MS, and P2SH.
So basically, any time a locking script contains OP_CHECKSIG and it's not a P2WPKH, P2WSH, or P2TR, use this legacy signing algorithm.
0. Create transaction
To start, you need to create some transaction data that spends bitcoins that you own.
This is basically where you select the inputs you want to spend, and then create the outputs you want to lock those spent inputs to. In other words, you're just describing the movement of coins for now.
Here's what my raw transaction looks like:
Raw Transaction (Unsigned):

version: 01000000
inputs:  01
  txid: b7994a0db2f373a29227e1d90da883c6ce1cb0dd2d6812e4558041ebbbcfa54b
  vout: 00000000
  scriptsigsize: 00
  scriptsig:
  sequence: ffffffff
outputs: 01
  amount: 983a000000000000
  scriptpubkeysize: 19
  scriptpubkey: 76a914b3e2819b6262e0b1f19fc7229d75677f347c91ac88ac
locktime: 00000000
The TXIDs inside raw transaction data are in reverse byte order.
Here I've selected the bitcoins I want to spend by referencing the TXID and a specific VOUT from a previous transaction. This is the input.
I've then created a new output containing an amount of bitcoins with a new ScriptPubKey lock on it (this is a P2PKH lock, but that's not important).
Most importantly, notice that the ScriptSig for the input is empty. This is where our signature will go, and we need to create one if we want to be able to send this transaction into the bitcoin network.
1. Remove existing ScriptSigs
We do not sign any existing ScriptSig data when signing a transaction.
So if you've already signed other inputs and created ScriptSigs (unlocking scripts) for them, remove them from the transaction temporarily.
In my transaction I'm only unlocking one input, so I don't have to remove any existing ScriptSigs.
You also have to remove any marker, flag, and witness data from the transaction. This only applies if you're making a segwit transaction (i.e. unlocking a P2WPKH or P2WSH in the same transaction).
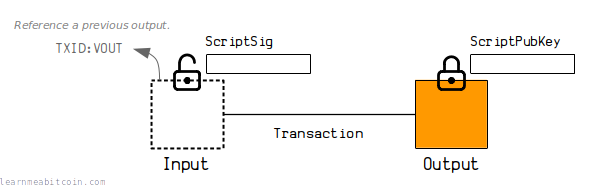
2. Put the ScriptPubKey as a placeholder in the ScriptSig
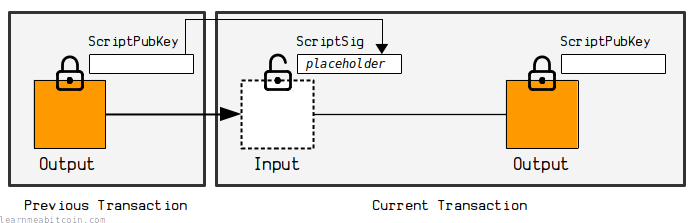
Before signing a legacy input, we need to put the ScriptPubKey from the output we want to spend into the ScriptSig of our input.
For example, looking at the raw transaction data for the output we want to spend, we can see that it has a P2PKH locking script of:
76a9144299ff317fcd12ef19047df66d72454691797bfc88ac
So we put this into the scriptsig as a placeholder:
Raw Transaction (Unsigned):

version: 01000000
inputs:  01
  txid: b7994a0db2f373a29227e1d90da883c6ce1cb0dd2d6812e4558041ebbbcfa54b
  vout: 00000000
  scriptsigsize: 19
  scriptsig: 76a9144299ff317fcd12ef19047df66d72454691797bfc88ac
  sequence: ffffffff
outputs: 01
  amount: 983a000000000000
  scriptpubkeysize: 19
  scriptpubkey: 76a914b3e2819b6262e0b1f19fc7229d75677f347c91ac88ac
locktime: 00000000
- The placeholder in the
scriptsigin the current transaction now contains thescriptpubkeyfrom the output of the previous transaction. - The
scriptpubkeyon the output in the current transaction is a new locking script.
The placeholder will adjust the value of scriptsigsize temporarily too.
We do this to signify the specific input we are signing, and that we're aware of the original locking script on the output we intend to spend.
3. Append signature hash type to transaction data
We now have to commit to how much of the transaction's structure we are going to be signing. We do this by appending a signature hash type to the current transaction data.
The most common is SIGHASH_ALL (0x01), which indicates that the signature covers all of the inputs and outputs in the transaction. This means that nobody else can add any additional inputs or outputs to it later on.
So this is what our raw unsigned transaction looks like now:
Raw Transaction (Unsigned):

version: 01000000
inputs:  01
  txid: b7994a0db2f373a29227e1d90da883c6ce1cb0dd2d6812e4558041ebbbcfa54b
  vout: 00000000
  scriptsigsize: 19
  scriptsig: 76a9144299ff317fcd12ef19047df66d72454691797bfc88ac
  sequence: ffffffff
outputs: 01
  amount: 983a000000000000
  scriptpubkeysize: 19
  scriptpubkey: 76a914b3e2819b6262e0b1f19fc7229d75677f347c91ac88ac
locktime: 00000000
sighash: 01000000
The sighash when appended to the transaction data is 4 bytes and in little-endian byte order.
4. Hash the transaction data
Now that we've prepared the raw unsigned transaction, we can now create a hash of it ready for signing.
Bitcoin uses double SHA-256 when hashing things (also referred to hash HASH256). So if we serialize our current unsigned transaction and hash it, we get:
message: 0100000001b7994a0db2f373a29227e1d90da883c6ce1cb0dd2d6812e4558041ebbbcfa54b000000001976a9144299ff317fcd12ef19047df66d72454691797bfc88acffffffff01983a0000000000001976a914b3e2819b6262e0b1f19fc7229d75677f347c91ac88ac0000000001000000

HASH256(message): a6b4103f527dfe43dfbadf530c247bac8a98b7463c7c6ad38eed97021d18ffcb
We always sign hashes of data. Hashing data creates a smaller fingerprint that's more efficient to sign.
HASH256(message) is shorthand for SHA-256(SHA-256(message)). You almost always use double SHA-256 when hashing data in Bitcoin.
5. Sign the transaction hash
Now we can just sign this message hash just like we would sign any message in ECDSA. All we need is our private key, and a randomly generated nonce.
This is what the raw signature for this transaction looks like:
nonce            (k): 75bcd15
hash256(message) (z): a6b4103f527dfe43dfbadf530c247bac8a98b7463c7c6ad38eed97021d18ffcb
private key      (d): f94a840f1e1a901843a75dd07ffcc5c84478dc4f987797474c9393ac53ab55e6

random point (k*G = R): {
  x = 4051293998585674784991639592782214972820158391371785981004352359465450369227,
  y = 88166831356626186178414913298033275054086243781277878360288998796587140930350
}

signature: r = R[x], s = k⁻¹ * (z + r * d): {
  r = 4051293998585674784991639592782214972820158391371785981004352359465450369227,
  s = 101656099268479774907861155236876278987061611115278341531512875302287938750185
}
The private key is the one that was used to create the public key that the output has been locked to.
You should always use a unique, randomly-generated nonce when creating a signature. If you reuse the same nonce with the same private key, your coins will be stolen. I've used a small, fixed nonce of 0x75bcd15 in this example so that you can recreate the exact same signature if you want to.
6. Use the low s value
Interestingly, in ECDSA there are actually two possible s values that will make for a valid signature. We call one the "high" s value, and we call the other the "low" s value.
In mathematical terms, the "other" valid s value is just the additive inverse of our current s value in the finite field of n. But don't worry about that for now.
As a result, both of these s values will actually get you to the same x-coordinate of the random point R when performing signature verification. In simple terms, this means there are basically two different versions of the same signature.
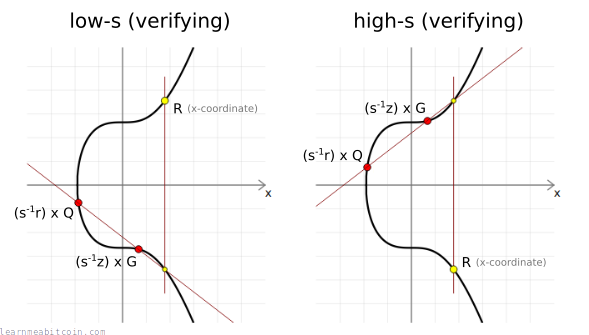
Anyway, in Bitcoin this feature is a bit annoying, because it means that anyone could invert the s value in our signature after we send our transaction into the network, and this would alter the resulting TXID for our signed transaction. This doesn't change the actual structure of the transaction (the money moves to the same place in the same way), but it does mean we lose the ability to reliably keep track of the transaction in a blockchain explorer.
So to help remedy this high/low s value problem, Bitcoin v0.10.3 and Bitcoin v0.11.1 (October 2015) introduced a standardness rule where all signatures must use the low s value by default, otherwise the transaction is considered non-standard and will not be relayed by nodes (see BIP 62 for details).
You'll know if you've ended up with the "high" s value because it will be in the upper half of the finite field of n (see ECDSA parameters). If this is the case (such as with our s value), we just subtract s value from n to give us the "low" s value:
n     = 115792089237316195423570985008687907852837564279074904382605163141518161494337

s     = 101656099268479774907861155236876278987061611115278341531512875302287938750185  <- high s value
n - s = 14135989968836420515709829771811628865775953163796562851092287839230222744152   <- low s value
As I say, both s values are technically valid – it's just in Bitcoin we use the low s value to help prevent transaction malleability.
This S-values in ECDSA Signatures chart shows how the prevalence of high s values has decreased over time. It was made the default in March 2014 (Bitcoin v0.9.0), before finally being made non-standard in October 2015 (Bitcoin v0.10.3 and Bitcoin v0.11.1).
7. DER encode the signature
The next step is to format the signature ready to be put inside a bitcoin transaction.
Bitcoin uses DER encoding for signatures, which is a bit verbose, but it's what Satoshi chose, so now we have to use it when encoding signatures before putting them inside transactions.
So if this is our raw signature:
signature: {
  r = 4051293998585674784991639592782214972820158391371785981004352359465450369227,
  s = 14135989968836420515709829771811628865775953163796562851092287839230222744152
}
This is what it looks like in DER encoding:
der encoded signature:
type: 30
  length: 44
  type:   02
    length: 20
    r:      08f4f37e2d8f74e18c1b8fde2374d5f28402fb8ab7fd1cc5b786aa40851a70cb
  type:   02
    length: 20
    s:      1f40afd1627798ee8529095ca4b205498032315240ac322c9d8ff0f205a93a58

serialized: 3044022008f4f37e2d8f74e18c1b8fde2374d5f28402fb8ab7fd1cc5b786aa40851a70cb02201f40afd1627798ee8529095ca4b205498032315240ac322c9d8ff0f205a93a58
8. Append signature hash type to DER encoded signature
After encoding our signature in to DER format, we once again append the signature hash type to indicate how much of the transaction data this signature applies to.
This must be the same value as the signature hash type we chose in step 3, which was SIGHASH_ALL (0x01)
So this is what our encoded signature looks like now:
der encoded signature (with SIGHASH):
type: 30
  length: 44
  type:   02
    length: 20
    r:      08f4f37e2d8f74e18c1b8fde2374d5f28402fb8ab7fd1cc5b786aa40851a70cb
  type:   02
    length: 20
    s:      1f40afd1627798ee8529095ca4b205498032315240ac322c9d8ff0f205a93a58
sighash: 01

serialized:
3044022008f4f37e2d8f74e18c1b8fde2374d5f28402fb8ab7fd1cc5b786aa40851a70cb02201f40afd1627798ee8529095ca4b205498032315240ac322c9d8ff0f205a93a5801
The SIGHASH type here is 1 byte, even though the SIGHASH type we appended to the transaction data before hashing is 4 bytes. This is just another quirk of bitcoin.
The reason we also appended the SIGHASH type before hashing is because it allows us to commit to that SIGHASH type before we create the signature. In other words, if someone changes this sighash type on the signature to something like SIGHASH_ANYONECANPAY (which suggests anyone could add more inputs to the transaction), it will not match the SIGHASH value we chose when we hashed and signed the initial transaction data, and so the signature would no longer be valid.
9. Construct the ScriptSig
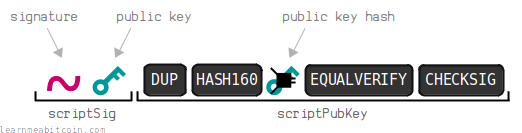
As a final step, we need to place this signature into a ScriptSig pattern that will unlock the input.
I'm not going to cover the mechanics of how Script work here. So for simplicity, I'll just remind you that our chosen input has the following P2PKH ScriptPubKey (locking script) on it:
scriptpubkey:

asm: OP_DUP OP_HASH OP_PUSHBYTES_20 [public key hash] OP_EQUALVERIFY OP_CHECKSIG
hex: 76a9144299ff317fcd12ef19047df66d72454691797bfc88ac
In short, this input has been locked to a public key hash. To unlock it, we need to provide a valid signature alongside the original public key.
So if this is our public key and signature:
public key: 024aeaf55040fa16de37303d13ca1dde85f4ca9baa36e2963a27a1c0c1165fe2b1
signature:  3044022008f4f37e2d8f74e18c1b8fde2374d5f28402fb8ab7fd1cc5b786aa40851a70cb02201f40afd1627798ee8529095ca4b205498032315240ac322c9d8ff0f205a93a5801
This is what our ScriptSig (unlocking script) looks like with the signature inside it:
scriptsig:

asm: OP_PUSHBYTES_71 [signature] OP_PUSHBYTES_33 [public key]
hex: 473044022008f4f37e2d8f74e18c1b8fde2374d5f28402fb8ab7fd1cc5b786aa40851a70cb02201f40afd1627798ee8529095ca4b205498032315240ac322c9d8ff0f205a93a580121024aeaf55040fa16de37303d13ca1dde85f4ca9baa36e2963a27a1c0c1165fe2b1
This is just the DER-encoded signature followed by the public key, with 0x47 and 0x21 bytes before each item to indicate their size.
10. Insert the ScriptSig into the transaction
Finally, we just pop this ScriptSig into the raw transaction data we started with:
Raw Transaction (Signed):

version: 01000000
inputs:  01
  txid: b7994a0db2f373a29227e1d90da883c6ce1cb0dd2d6812e4558041ebbbcfa54b
  vout: 00000000
  scriptsigsize: 6a
  scriptsig: 473044022008f4f37e2d8f74e18c1b8fde2374d5f28402fb8ab7fd1cc5b786aa40851a70cb02201f40afd1627798ee8529095ca4b205498032315240ac322c9d8ff0f205a93a580121024aeaf55040fa16de37303d13ca1dde85f4ca9baa36e2963a27a1c0c1165fe2b1
  sequence: ffffffff
outputs: 01
  amount: 983a000000000000
  scriptpubkeysize: 19
  scriptpubkey: 76a914b3e2819b6262e0b1f19fc7229d75677f347c91ac88ac
locktime: 00000000
Don't forget to update the scriptsigsize field.
You will need to repeat steps 1-9 for each input you want to unlock.
Finally, if we serialize this transaction data we get:
Raw Transaction (Signed):

0100000001b7994a0db2f373a29227e1d90da883c6ce1cb0dd2d6812e4558041ebbbcfa54b000000006a473044022008f4f37e2d8f74e18c1b8fde2374d5f28402fb8ab7fd1cc5b786aa40851a70cb02201f40afd1627798ee8529095ca4b205498032315240ac322c9d8ff0f205a93a580121024aeaf55040fa16de37303d13ca1dde85f4ca9baa36e2963a27a1c0c1165fe2b1ffffffff01983a0000000000001976a914b3e2819b6262e0b1f19fc7229d75677f347c91ac88ac00000000
And that's a valid transaction that we can send into the bitcoin network.
This is a real transaction that I constructed myself to use as an example. You can view it in a blockchain explorer here: 1d5308ff12cb6fdb670c3af673a6a1317e21fa14fc863d5827f9d704cd5e14dc
bitcoin-cli sendrawtransaction
Use this command to send a raw transaction into the bitcoin network. For example:
$ bitcoin-cli sendrawtransaction 0100000001b7994a0db2f373a29227e1d90da883c6ce1cb0dd2d6812e4558041ebbbcfa54b000000006a473044022008f4f37e2d8f74e18c1b8fde2374d5f28402fb8ab7fd1cc5b786aa40851a70cb02201f40afd1627798ee8529095ca4b205498032315240ac322c9d8ff0f205a93a580121024aeaf55040fa16de37303d13ca1dde85f4ca9baa36e2963a27a1c0c1165fe2b1ffffffff01983a0000000000001976a914b3e2819b6262e0b1f19fc7229d75677f347c91ac88ac00000000
Code
Here's some Ruby code that signs a transaction using the legacy algorithm.
The first half of the code contains the elliptic curve mathematics required for creating ECDSA signatures, and the second half contains the code for actually signing a transaction and getting the signature into the right format.
The code is basic, but it works.

 copied
 copied
require "digest" # for hashing transaction data so we can sign it
require "securerandom" # for generating random nonces when signing
# -------------------------
# Elliptic Curve Parameters
# -------------------------
# y² = x³ + ax + b
$a = 0
$b = 7
# prime field
$p = 2 ** 256 - 2 ** 32 - 2 ** 9 - 2 ** 8 - 2 ** 7 - 2 ** 6 - 2 ** 4 - 1
# number of points on the curve we can hit ("order")
$n = 115792089237316195423570985008687907852837564279074904382605163141518161494337
# generator point (the starting point on the curve used for all calculations)
$G = {
x: 55066263022277343669578718895168534326250603453777594175500187360389116729240,
y: 32670510020758816978083085130507043184471273380659243275938904335757337482424,
}
# ---------------
# Modular Inverse: Ruby doesn't have a built-in modinv function
# ---------------
def inverse(a, m = $p)
m_orig = m # store original modulus
a = a % m if a < 0 # make sure a is positive
y_prev = 0
y = 1
while a > 1
q = m / a
y_before = y # store current value of y
y = y_prev - q * y # calculate new value of y
y_prev = y_before # set previous y value to the old y value
a_before = a # store current value of a
a = m % a # calculate new value of a
m = a_before # set m to the old a value
end
return y % m_orig
end
# CUT:inverse
# ------
# Double: add a point to itself
# ------
def double(point)
# slope = (3x₁² + a) / 2y₁
slope = ((3 * point[:x] ** 2 + $a) * inverse((2 * point[:y]), $p)) % $p # using inverse to help with division
# x = slope² - 2x₁
x = (slope ** 2 - (2 * point[:x])) % $p
# y = slope * (x₁ - x) - y₁
y = (slope * (point[:x] - x) - point[:y]) % $p
# Return the new point
return { x: x, y: y }
end
# ---
# Add: add two points together
# ---
def add(point1, point2)
# double if both points are the same
if point1 == point2
return double(point1)
end
# slope = (y₁ - y₂) / (x₁ - x₂)
slope = ((point1[:y] - point2[:y]) * inverse(point1[:x] - point2[:x], $p)) % $p
# x = slope² - x₁ - x₂
x = (slope ** 2 - point1[:x] - point2[:x]) % $p
# y = slope * (x₁ - x) - y₁
y = ((slope * (point1[:x] - x)) - point1[:y]) % $p
# Return the new point
return { x: x, y: y }
end
# --------
# Multiply: use double and add operations to quickly multiply a point by an integer value (i.e. a private key)
# --------
def multiply(k, point = $G)
# create a copy the initial starting point (for use in addition later on)
current = point
# convert integer to binary representation
binary = k.to_s(2)
# double and add algorithm for fast multiplication
binary.split("").drop(1).each do |char| # from left to right, ignoring first binary character
# 0 = double
current = double(current)
# 1 = double and add
current = add(current, point) if char == "1"
end
# return the final point
current
end
# ----
# Sign
# ----
def sign(private_key, hash, nonce = nil)
# generate random number if not given
if nonce == nil
loop do
nonce = SecureRandom.hex(32).to_i(16)
break if nonce < $n # make sure random number is below the number of points of the curve
end
end
# r = the x value of a random point on the curve
r = multiply(nonce)[:x] % $n
# s = nonce⁻¹ * (hash + private_key * r) mod n
s = (inverse(nonce, $n) * (hash + private_key * r)) % $n # this breaks linearity (compared to schnorr)
# signature is [r, s]
return { r: r, s: s }
end
# ------------------
# Sign A Transaction
# ------------------
# A basic structure for holding the transaction data
def tx(scriptsig)
# Need to calculate a byte indicating the size of upcoming scriptsig in bytes (rough code but does the job)
size = (scriptsig.length / 2).to_s(16).rjust(2, "0")
# Raw unsigned transaction data with the scriptsig field (you need to know the correct position)
return "0100000001b7994a0db2f373a29227e1d90da883c6ce1cb0dd2d6812e4558041ebbbcfa54b00000000#{size}#{scriptsig}ffffffff01983a0000000000001976a914b3e2819b6262e0b1f19fc7229d75677f347c91ac88ac00000000"
end
# Private key and public key for the locked up bitcoins we want to spend
private_key = "f94a840f1e1a901843a75dd07ffcc5c84478dc4f987797474c9393ac53ab55e6" # sha256("learnmeabitcoin1")
public_key = "024aeaf55040fa16de37303d13ca1dde85f4ca9baa36e2963a27a1c0c1165fe2b1"
# NOTE: Need to remove all existing signatures from the transaction data first if there are any
# Put original scriptpubkey as a placeholder in to the scriptsig for the input you want to sign (required)
scriptpubkey = "76a9144299ff317fcd12ef19047df66d72454691797bfc88ac" # just one input in this transaction
transaction = tx(scriptpubkey)
# Append sighash type to transaction data (required)
transaction = transaction + "01000000"
# Get a hash of the transaction data (because we sign the hash of data and not the actual data itself)
hash = Digest::SHA256.hexdigest(Digest::SHA256.digest([transaction].pack("H*")))
# Use elliptic curve mathematics to sign the hash using the private key and nonce
signature = sign(private_key.to_i(16), hash.to_i(16), 123456789) # using a fixed nonce for testing (unsafe)
# Use the low s value (BIP 62: Dealing with malleability)
if (signature[:s] > $n / 2)
signature[:s] = $n - signature[:s]
end
# Encode the signature in to DER format (slightly awkward format used for signatures in bitcoin transactions)
r = signature[:r].to_s(16).rjust(64, "0") # convert r to hexadecimal
s = signature[:s].to_s(16).rjust(64, "0") # convert s to hexadecimal
r = "00" + r if (r[0, 2].to_i(16) >= 0x80) # prepend 00 if first byte is 0x80 or above (DER quirk)
s = "00" + r if (s[0, 2].to_i(16) >= 0x80) # prepend 00 if first byte is 0x80 or above (DER quirk)
der = "" # string for holding our der encoding
r_len = (r.length / 2).to_s(16).rjust(2, "0") # get length of r (in bytes)
s_len = (s.length / 2).to_s(16).rjust(2, "0") # get length of s (in bytes)
der << "02" << r_len << r << "02" << s_len << s # Add to DER encoding (0x20 byte indicates an integer type in DER)
der_len = (der.length / 2).to_s(16).rjust(2, "0") # get length of DER data (in bytes)
der = "30" + der_len + der # Final DER encoding (0x30 byte indicates compound object type)
# Append sighashtype to the signature (required) (01 = ALL)
der = der + "01" # without it you get "mandatory-script-verify-flag-failed (Non-canonical DER signature) (code 16)"
# Construct full unlocking script (P2PKH scripts need original public key the bitcoins were locked to): <size> {signature} <size> {public_key}
scriptsig = (der.length / 2).to_s(16) + der + (public_key.length / 2).to_s(16) + public_key
# Put the full scriptsig in to the original transaction data
transaction = tx(scriptsig)
# Show the signed transaction
puts transaction #=> 0100000001b7994a0db2f373a29227e1d90da883c6ce1cb0dd2d6812e4558041ebbbcfa54b000000006a473044022008f4f37e2d8f74e18c1b8fde2374d5f28402fb8ab7fd1cc5b786aa40851a70cb02201f40afd1627798ee8529095ca4b205498032315240ac322c9d8ff0f205a93a580121024aeaf55040fa16de37303d13ca1dde85f4ca9baa36e2963a27a1c0c1165fe2b1ffffffff01983a0000000000001976a914b3e2819b6262e0b1f19fc7229d75677f347c91ac88ac00000000
# Send the transaction in to the bitcoin network
# $ bitcoin-cli sendrawtransaction [raw transaction data]
Segwit Algorithm
This new segwit signature algorithm was introduced in the Segregated Witness upgrade, and is used when creating signatures to unlock the new P2WPKH locking script.
It has two benefits over the old "legacy algorithm":
- More efficient. The transaction data gets split in to separate reusable parts when constructing a transaction hash for signing. This speeds up the signing process if there are multiple transaction inputs that you need to create signatures for.
- Requires the input amount. You have to include the amount from the input you are spending when creating each signature. This forces you to be aware of the value of the inputs to the transaction, which is useful for working out the transaction fee.
The steps for creating a signature are pretty much the same as in the legacy algorithm. The only difference is in the way you prepare the transaction data for signing.
I've repeated a lot of the same steps as above just so I can show you a complete example of how to sign and spend a P2WPKH output.
0. Create transaction
Start by creating a raw unsigned transaction.
This is what my transaction looks like:
Raw Transaction (Unsigned):

version: 02000000
marker: 00
flag: 01
inputs:  01
  txid: ac4994014aa36b7f53375658ef595b3cb2891e1735fe5b441686f5e53338e76a
  vout: 01000000
  scriptsigsize: 00
  scriptsig:
  sequence: ffffffff
outputs: 01
  amount: 204e000000000000
  scriptpubkeysize: 19
  scriptpubkey: 76a914ce72abfd0e6d9354a660c18f2825eb392f060fdc88ac
witness: 00
locktime: 00000000
Don't forget that a segwit transaction (i.e. a transaction with a P2WPKH or P2WSH input) must include the new marker, flag, and witness fields.
In this transaction I'm spending a P2WPKH output (worth 30,000 sats) from a previous transaction as my input. I'm then "sending" it to a new P2PKH output (worth 20,000 sats).
As you can see, the witness field is currently empty. This is where my signature will eventually be placed.
The ScriptSig field is not going to be used, as P2WPKH inputs use the Witness field for the unlocking code instead of the legacy ScriptSig field.
1. Construct the preimage and preimage hash
This is where the segwit signature algorithm differs from the legacy signing algorithm.
Instead of hashing the transaction data as it is, we break it down in to individual pieces, then reconstruct them in a specific way to create a new piece of data that can be hashed for signing.
The reason for this is that many parts of the unsigned transaction data can be reused later on if the transaction has many inputs that we need to create signatures for.
1. Grab the version field (reusable)
Start by taking the version field from the raw unsigned transaction.
version = 020000002. Serialize and hash the TXIDs and VOUTs for the inputs (reusable)
Next, we serialize all of the TXID+VOUTs for all of the inputs in the transaction, then hash them using HASH256.
inputs          = ac4994014aa36b7f53375658ef595b3cb2891e1735fe5b441686f5e53338e76a01000000
hash256(inputs) = cbfaca386d65ea7043aaac40302325d0dc7391a73b585571e28d3287d6b16203My transaction only has one input, so the result just hash256(TXID+VOUT).
If I had more inputs, the result would be hash256((TXID+VOUT)+(TXID+VOUT)+(TXID+VOUT)...).
3. Serialize and hash the sequences for the inputs (reusable)
This is the same as the previous step, except we serialize and hash the input sequences separately:
sequences          = ffffffff
hash256(sequences) = 3bb13029ce7b1f559ef5e747fcac439f1455a2ec7c5f09b72290795e706650444. Serialize the TXID and VOUT for the input we're signing (not reusable)
Next we serialize the TXID+VOUT for the specific input we want to create a signature for.
My transaction only has one input, so this is the same value as the serialized TXID+VOUT in step 2.
input = ac4994014aa36b7f53375658ef595b3cb2891e1735fe5b441686f5e53338e76a010000005. Create a scriptcode for the input we're signing (not reusable)
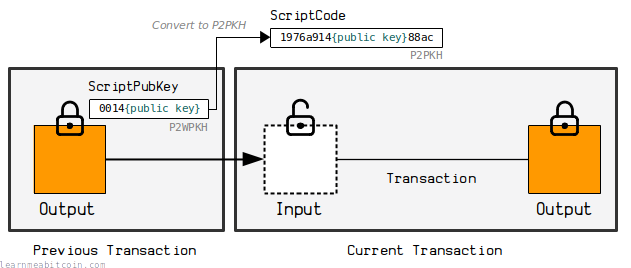
The "scriptcode" is a modified version of the ScriptPubKey from the output we're spending.
To create the scriptcode, you need to find to the ScriptPubKey on the output you want to spend, extract the public key hash, and place it into the following P2PKH ScriptPubKey structure:
scriptcode = 1976a914{publickeyhash}88acIf we look at the previous transaction, we see that the ScriptPubKey on the P2WPKH output I'm spending is:
scriptpubkey = 0014aa966f56de599b4094b61aa68a2b3df9e97e9c48So the scriptcode is:
scriptcode = 1976a914aa966f56de599b4094b61aa68a2b3df9e97e9c4888acAs you can see, I've simply extracted the public key hash (aa966f56de599b4094b61aa68a2b3df9e97e9c48) from the original locking script, and placed it into a P2PKH locking script instead.
I'm not entirely sure why we do this. My only guess is that it means the scriptcode is similar to the placeholder used in step 2 of the legacy algorithm.
6. Find the input amount (not reusable)
Next we find out the value of the input. If we look at the previous transaction, the output has a value of 30000 satoshis.
If we convert 30000 to an 8-byte little-endian field (the same structure as the amount field in a raw transaction), we get:
amount = 30750000000000007. Grab the sequence for the input we're signing (not reusable)
This is the sequence field for the input we're creating the signature for.
My transaction only has one input, so this is the same as the sequences in step 3.
sequence = ffffffff8. Serialize and hash all the outputs (reusable)
In this step we serialize all of the data for the outputs in the transaction, then hash them using HASH256.
outputs          = 204e0000000000001976a914ce72abfd0e6d9354a660c18f2825eb392f060fdc88ac
hash256(outputs) = 900a6c6ff6cd938bf863e50613a4ed5fb1661b78649fe354116edaf5d4abb952
My transaction only has one output, so the result just hash256(amount+scriptpubkeysize+scriptpubkey).
If I had more outputs, I would serialize the data for all of the outputs one after the other (similar to how we serialized the inputs in step 2).
9. Grab the locktime (reusable)
This is just the locktime field from our raw unsigned transaction.
locktime = 0000000010. Combine to create a hash preimage
Now we concatenate all of these pieces from the steps above to create a hash "preimage".
This is basically a reconstruction of all the raw transaction data we want to sign from the steps above:
preimage = version + hash256(inputs) + hash256(sequences) + input + scriptcode + amount + sequence + hash256(outputs) + locktime

preimage = 02000000cbfaca386d65ea7043aaac40302325d0dc7391a73b585571e28d3287d6b162033bb13029ce7b1f559ef5e747fcac439f1455a2ec7c5f09b72290795e70665044ac4994014aa36b7f53375658ef595b3cb2891e1735fe5b441686f5e53338e76a010000001976a914aa966f56de599b4094b61aa68a2b3df9e97e9c4888ac3075000000000000ffffffff900a6c6ff6cd938bf863e50613a4ed5fb1661b78649fe354116edaf5d4abb95200000000
11. Add signature hash type to the end of the hash preimage
Now we add a signature hash type to the end of this preimage to indicate how much of the transaction data we are signing.
In this example I want to create a signature that applies to the entire transaction, so I'm using SIGHASH_ALL (0x01).
preimage = 02000000cbfaca386d65ea7043aaac40302325d0dc7391a73b585571e28d3287d6b162033bb13029ce7b1f559ef5e747fcac439f1455a2ec7c5f09b72290795e70665044ac4994014aa36b7f53375658ef595b3cb2891e1735fe5b441686f5e53338e76a010000001976a914aa966f56de599b4094b61aa68a2b3df9e97e9c4888ac3075000000000000ffffffff900a6c6ff6cd938bf863e50613a4ed5fb1661b78649fe354116edaf5d4abb9520000000001000000The signature hash type is a 4-byte little-endian field when we add it to the transaction data hash preimage.
12. Hash the preimage
Finally, we hash this preimage using HASH256 to create the final message that we are going to be signing:
message = hash256(preimage)
message = d7b60220e1b9b2c1ab40845118baf515203f7b6f0ad83cbb68d3c89b5b3098a6
2. Sign the preimage hash
Using the preimage hash we created in the previous step, we sign it using the private key and a randomly generated nonce:
nonce             (k): 75bcd15 (hex)
hash256(preimage) (z): d7b60220e1b9b2c1ab40845118baf515203f7b6f0ad83cbb68d3c89b5b3098a6 (hex)
private key       (d): 7306f5092467981e66eff98b6b03bfe925922c5ecfaf14c4257ef18e81becf1f (hex)

random point (k*G = R): {
  x = 4051293998585674784991639592782214972820158391371785981004352359465450369227,
  y = 88166831356626186178414913298033275054086243781277878360288998796587140930350
}

signature: r = R[x], s = k⁻¹ * (z + r * d): {
  r = 4051293998585674784991639592782214972820158391371785981004352359465450369227,
  s = 22928756034338380041288899807245402174768928418361705349511346173579327129676
}
You should always use a unique, randomly-generated nonce when creating a signature. If you re-use the same nonce with the same private key your coins will be stolen. I've used a small, fixed nonce of 0x75bcd15 in this example so that you can recreate the exact same signature if you want to.
3. Use the low s value
In Bitcoin we now always use the low s value from the signature. If we were to use the high s value, the transaction would be considered non-standard and would not be relayed by nodes on the network.
In this example transaction, the s value was already the low value, so I do not need to convert it.
s (high) = 92863333202977815382282085201442505678068635860713199033093816967938834364661
s (low)  = 22928756034338380041288899807245402174768928418361705349511346173579327129676
4. DER encode the signature
Next we convert the r and s values from the signature in to DER encoding.
signature: {
  r = 4051293998585674784991639592782214972820158391371785981004352359465450369227,
  s = 22928756034338380041288899807245402174768928418361705349511346173579327129676
}

der encoded signature:
type: 30
  length: 44
  type:   02
    length: 20
    r:      08f4f37e2d8f74e18c1b8fde2374d5f28402fb8ab7fd1cc5b786aa40851a70cb
  type:   02
    length: 20
    s:      32b1374d1a0f125eae4f69d1bc0b7f896c964cfdba329f38a952426cf427484c

serialized: 3044022008f4f37e2d8f74e18c1b8fde2374d5f28402fb8ab7fd1cc5b786aa40851a70cb022032b1374d1a0f125eae4f69d1bc0b7f896c964cfdba329f38a952426cf427484c
5. Append signature hash type to DER encoded signature
Don't forget to add the signature hash type to the signature. It must be the same value as the one we appended to the preimage hash in step 1.
The signature hash type I'm using is SIGHASH_ALL (0x01).
der encoded signature (with sighash): 3044022008f4f37e2d8f74e18c1b8fde2374d5f28402fb8ab7fd1cc5b786aa40851a70cb022032b1374d1a0f125eae4f69d1bc0b7f896c964cfdba329f38a952426cf427484c01
The signature hash type appended to a DER-encoded signature is 1 byte in size (as opposed to 4-byte little-endian sighash type in step 1).
6. Construct the witness field
Now that we've got our complete signature, we need to construct the full unlocking code that will unlock the input.
The output I'm spending had a P2WPKH ScriptPubKey (locking script) on it. So to unlock it, I need to construct a witness field containing the signature and the original public key.
I'm not going to cover the details of the structure of a witness field here, so I'll just show you what it looks like:
signature:  3044022008f4f37e2d8f74e18c1b8fde2374d5f28402fb8ab7fd1cc5b786aa40851a70cb022032b1374d1a0f125eae4f69d1bc0b7f896c964cfdba329f38a952426cf427484c01
public key: 03eed0d937090cae6ffde917de8a80dc6156e30b13edd5e51e2e50d52428da1c87

witness = 02473044022008f4f37e2d8f74e18c1b8fde2374d5f28402fb8ab7fd1cc5b786aa40851a70cb022032b1374d1a0f125eae4f69d1bc0b7f896c964cfdba329f38a952426cf427484c012103eed0d937090cae6ffde917de8a80dc6156e30b13edd5e51e2e50d52428da1c87
7. Insert the witness field into the transaction
Finally, we insert this complete witness field into the transaction:
version: 02000000
marker: 00
flag: 01
inputs:  01
  txid: ac4994014aa36b7f53375658ef595b3cb2891e1735fe5b441686f5e53338e76a
  vout: 01000000
  scriptsigsize: 00
  scriptsig:
  sequence: ffffffff
outputs: 01
  amount: 204e000000000000
  scriptpubkeysize: 19
  scriptpubkey: 76a914ce72abfd0e6d9354a660c18f2825eb392f060fdc88ac
witness: 02473044022008f4f37e2d8f74e18c1b8fde2374d5f28402fb8ab7fd1cc5b786aa40851a70cb022032b1374d1a0f125eae4f69d1bc0b7f896c964cfdba329f38a952426cf427484c012103eed0d937090cae6ffde917de8a80dc6156e30b13edd5e51e2e50d52428da1c87
locktime: 00000000
If we serialize this transaction data we get:
02000000000101ac4994014aa36b7f53375658ef595b3cb2891e1735fe5b441686f5e53338e76a0100000000ffffffff01204e0000000000001976a914ce72abfd0e6d9354a660c18f2825eb392f060fdc88ac02473044022008f4f37e2d8f74e18c1b8fde2374d5f28402fb8ab7fd1cc5b786aa40851a70cb022032b1374d1a0f125eae4f69d1bc0b7f896c964cfdba329f38a952426cf427484c012103eed0d937090cae6ffde917de8a80dc6156e30b13edd5e51e2e50d52428da1c8700000000
And that's our transaction signed and ready to be sent into the bitcoin network.
This is a real transaction that I made. You can view it in a blockchain explorer here: 04f7bc0296fe70799762e628445fa9f0ccc2a2646ee5b369047d86ff964bd74e
bitcoin-cli sendrawtransaction
Use this command to send a raw transaction into the bitcoin network. For example:
$ bitcoin-cli sendrawtransaction 02000000000101ac4994014aa36b7f53375658ef595b3cb2891e1735fe5b441686f5e53338e76a0100000000ffffffff01204e0000000000001976a914ce72abfd0e6d9354a660c18f2825eb392f060fdc88ac02473044022008f4f37e2d8f74e18c1b8fde2374d5f28402fb8ab7fd1cc5b786aa40851a70cb022032b1374d1a0f125eae4f69d1bc0b7f896c964cfdba329f38a952426cf427484c012103eed0d937090cae6ffde917de8a80dc6156e30b13edd5e51e2e50d52428da1c8700000000
Code
Here's some Ruby code that signs a transaction using the segwit algorithm.
Again, this code is just here to show you the basic steps involved in creating a signature for a P2WPKH.
copiedcopiedrequire "digest" # for hashing transaction data so we can sign it
require "securerandom" # for generating random nonces when signing

# -------------------------
# Elliptic Curve Parameters
# -------------------------
# y² = x³ + ax + b
$a = 0
$b = 7

# prime field
$p = 2 ** 256 - 2 ** 32 - 2 ** 9 - 2 ** 8 - 2 ** 7 - 2 ** 6 - 2 ** 4 - 1

# number of points on the curve we can hit ("order")
$n = 115792089237316195423570985008687907852837564279074904382605163141518161494337

# generator point (the starting point on the curve used for all calculations)
$G = {
  x: 55066263022277343669578718895168534326250603453777594175500187360389116729240,
  y: 32670510020758816978083085130507043184471273380659243275938904335757337482424,
}

# ---------------
# Modular Inverse: Ruby doesn't have a built-in modinv function
# ---------------
def inverse(a, m = $p)
  m_orig = m         # store original modulus
  a = a % m if a < 0 # make sure a is positive
  y_prev = 0
  y = 1
  while a > 1
    q = m / a

    y_before = y # store current value of y
    y = y_prev - q * y # calculate new value of y
    y_prev = y_before # set previous y value to the old y value

    a_before = a # store current value of a
    a = m % a # calculate new value of a
    m = a_before # set m to the old a value
  end
  return y % m_orig
end
# CUT:inverse

# ------
# Double: add a point to itself
# ------
def double(point)
  # slope = (3x₁² + a) / 2y₁
  slope = ((3 * point[:x] ** 2 + $a) * inverse((2 * point[:y]), $p)) % $p # using inverse to help with division

  # x = slope² - 2x₁
  x = (slope ** 2 - (2 * point[:x])) % $p

  # y = slope * (x₁ - x) - y₁
  y = (slope * (point[:x] - x) - point[:y]) % $p

  # Return the new point
  return { x: x, y: y }
end

# ---
# Add: add two points together
# ---
def add(point1, point2)
  # double if both points are the same
  if point1 == point2
    return double(point1)
  end

  # slope = (y₁ - y₂) / (x₁ - x₂)
  slope = ((point1[:y] - point2[:y]) * inverse(point1[:x] - point2[:x], $p)) % $p

  # x = slope² - x₁ - x₂
  x = (slope ** 2 - point1[:x] - point2[:x]) % $p

  # y = slope * (x₁ - x) - y₁
  y = ((slope * (point1[:x] - x)) - point1[:y]) % $p

  # Return the new point
  return { x: x, y: y }
end


# --------
# Multiply: use double and add operations to quickly multiply a point by an integer value (i.e. a private key)
# --------
def multiply(k, point = $G)
  # create a copy the initial starting point (for use in addition later on)
  current = point

  # convert integer to binary representation
  binary = k.to_s(2)

  # double and add algorithm for fast multiplication
  binary.split("").drop(1).each do |char| # from left to right, ignoring first binary character
    # 0 = double
    current = double(current)

    # 1 = double and add
    current = add(current, point) if char == "1"
  end

  # return the final point
  current
end


# ----
# Sign
# ----
def sign(private_key, hash, nonce = nil)
  # generate random number if not given
  if nonce == nil
    loop do
      nonce = SecureRandom.hex(32).to_i(16)
      break if nonce < $n # make sure random number is below the number of points of the curve
    end
  end

  # r = the x value of a random point on the curve
  r = multiply(nonce)[:x] % $n

  # s = nonce⁻¹ * (hash + private_key * r) mod n
  s = (inverse(nonce, $n) * (hash + private_key * r)) % $n # this breaks linearity (compared to schnorr)

  # signature is [r, s]
  return { r: r, s: s }
end


# ------------------
# Sign A Transaction
# ------------------

# A basic structure for holding the raw transaction data
# It's easier to use a flexible structure so that we can split in to parts for use with the BIP143 signing algorithm
tx = {
  :version => "02000000",
  :marker => "00",
  :flag => "01",
  :inputcount => "01",
  :inputs => {
    0 => {
      :txid => "ac4994014aa36b7f53375658ef595b3cb2891e1735fe5b441686f5e53338e76a",
      :vout => "01000000",
      :scriptsigsize => "00",
      :scriptsig => "",
      :sequence => "ffffffff",
    }
  },
  :outputcount => "01",
  :outputs => {
    0 => {
      :amount => "204e000000000000",
      :scriptpubkeysize => "19",
      :scriptpubkey => "76a914ce72abfd0e6d9354a660c18f2825eb392f060fdc88ac",
    }
  },
  :witness => "00",
  :locktime => "00000000",
}

# Private key and public key for the locked up bitcoins we want to spend
private_key = "7306f5092467981e66eff98b6b03bfe925922c5ecfaf14c4257ef18e81becf1f"
public_key = "03eed0d937090cae6ffde917de8a80dc6156e30b13edd5e51e2e50d52428da1c87"

# The value of the input we're spending in satoshis (need to find this out beforehand, required for BIP 143 signing algorithm)
input_value = 30000

# Prepare the parts of the raw unsigned transaction data ready to construct the hash preimage

# 1. Serialize and hash the input txids and vouts
prevouts = ""
tx[:inputs].each do |i, input|
  prevouts << "#{input[:txid]}#{input[:vout]}"
end
prevouts_hash = Digest::SHA256.hexdigest(Digest::SHA256.digest([prevouts].pack("H*")))

# 2. Serialize and hash the input sequences
sequences = ""
tx[:inputs].each do |i, input|
  sequences << input[:sequence]
end
sequences_hash = Digest::SHA256.hexdigest(Digest::SHA256.digest([sequences].pack("H*")))

# 3. Serialize and hash the outputs
outputs = ""
tx[:outputs].each do |i, output|
  outputs << "#{output[:amount]}#{output[:scriptpubkeysize]}#{output[:scriptpubkey]}"
end
outputs_hash = Digest::SHA256.hexdigest(Digest::SHA256.digest([outputs].pack("H*")))

# 4. Serialize the specific input we're signing
input = tx[:inputs][0][:txid] + tx[:inputs][0][:vout]

# 5. Construct the scriptcode for the input we're signing (the public key hash inside an equivalent P2PKH script)
scriptcode = "1976a914#{Digest::RMD160.hexdigest(Digest::SHA256.digest([public_key].pack("H*")))}88ac"

# 6. Serialize the amount of the input (need to know this beforehand)
amount = input_value.to_i.to_s(16).rjust(16, '0').to_s.scan(/../).reverse.join # hexadecimal, 8 byte, little-endian

# 7. Get the sequence for the input we're signing
sequence = tx[:inputs][0][:sequence]

# Construct the hash preimage
preimage = "";
preimage << tx[:version]; # reusable
preimage << prevouts_hash; # reusable
preimage << sequences_hash; # reusable
preimage << input;
preimage << scriptcode;
preimage << amount;
preimage << sequence;
preimage << outputs_hash; # reusable
preimage << tx[:locktime]; # reusable

# Add sighash type to preimage (01 = SIGHASH_ALL)
preimage = preimage + "01000000"

# Hash the preimage to create the message that we're going to sign
hash = Digest::SHA256.hexdigest(Digest::SHA256.digest([preimage].pack("H*")))

# Use elliptic curve mathematics to sign the hash using the private key and nonce
signature = sign(private_key.to_i(16), hash.to_i(16), 123456789) # using a fixed nonce for testing (unsafe)

# Use the low s value (BIP 62: Dealing with malleability)
if (signature[:s] > $n / 2)
  signature[:s] = $n - signature[:s]
end

# Encode the signature in to DER format (slightly awkward format used for signatures in bitcoin transactions)
r = signature[:r].to_s(16).rjust(64, "0")  # convert r to hexadecimal
s = signature[:s].to_s(16).rjust(64, "0")  # convert s to hexadecimal
r = "00" + r if (r[0, 2].to_i(16) >= 0x80) # prepend 00 if first byte is 0x80 or above (DER quirk)
s = "00" + r if (s[0, 2].to_i(16) >= 0x80) # prepend 00 if first byte is 0x80 or above (DER quirk)
der = ""                                   # string for holding our der encoding
r_len = (r.length / 2).to_s(16).rjust(2, "0") # get length of r (in bytes)
s_len = (s.length / 2).to_s(16).rjust(2, "0") # get length of s (in bytes)
der << "02" << r_len << r << "02" << s_len << s   # Add to DER encoding (0x20 byte indicates an integer type in DER)
der_len = (der.length / 2).to_s(16).rjust(2, "0") # get length of DER data (in bytes)
der = "30" + der_len + der # Final DER encoding (0x30 byte indicates compound object type)

# Append sighashtype to the signature (required) (01 = SIGHASH_ALL)
der_signature = der + "01" # without it you get "mandatory-script-verify-flag-failed (Non-canonical DER signature) (code 16)"

# Calculate the size of the signature (will be either 0x47 or 0x48 bytes in length)
der_signature_len = (der_signature.length / 2).to_s(16).rjust(2, "0") # technically a "compact size" field, but a single byte here is enough for the size of signatures

# Construct full unlocking script (this is a witness field containing 2 items: a signature followed by a public key)
witness = "02#{der_signature_len}#{der_signature}21#{public_key}"

# Put the witness in to the original transaction data
tx[:witness] = witness

# Serialize the signed raw transaction data so we can send it into the network
transaction = ""
transaction << tx[:version]
transaction << tx[:marker]
transaction << tx[:flag]
transaction << tx[:inputcount]
transaction << tx[:inputs][0][:txid]
transaction << tx[:inputs][0][:vout]
transaction << tx[:inputs][0][:scriptsigsize]
transaction << tx[:inputs][0][:scriptsig]
transaction << tx[:inputs][0][:sequence]
transaction << tx[:outputcount]
transaction << tx[:outputs][0][:amount]
transaction << tx[:outputs][0][:scriptpubkeysize]
transaction << tx[:outputs][0][:scriptpubkey]
transaction << tx[:witness]
transaction << tx[:locktime]

# Show the signed transaction
puts transaction #=> 02000000000101ac4994014aa36b7f53375658ef595b3cb2891e1735fe5b441686f5e53338e76a0100000000ffffffff01204e0000000000001976a914ce72abfd0e6d9354a660c18f2825eb392f060fdc88ac02473044022008f4f37e2d8f74e18c1b8fde2374d5f28402fb8ab7fd1cc5b786aa40851a70cb022032b1374d1a0f125eae4f69d1bc0b7f896c964cfdba329f38a952426cf427484c012103eed0d937090cae6ffde917de8a80dc6156e30b13edd5e51e2e50d52428da1c8700000000

# Send the transaction in to the bitcoin network
# $ bitcoin-cli sendrawtransaction [raw transaction data]
Taproot Algorithm
See taproot signature algorithm for details.
The taproot signing algorithm was introduced in the Taproot upgrade, and is used when creating signatures to unlock the new P2TR locking script.
It's similar to the segwit algorithm, but it has some minor adjustments to the preimage construction, and it uses the Schnorr signature scheme instead of ECDSA.
The taproot signature algorithm includes a lot of additional P2TR-specific data, and varies depending on the method you're using for spending. I think it's easier to follow the steps for creating signatures for P2TR outputs on the Taproot page itself, rather than trying to outline them here.
Location
Where can you find signatures in Bitcoin?
Signatures can be found within the ScriptSigs and/or Witness area of a transaction.
In other words, they're inside the fields of used for unlocking inputs.
The exact location of each signature depends on the type of locking script that has been placed on a previous output. Here are a few common examples of where you'll find signatures in raw transactions:
P2PK
When unlocking a P2PK, a single signature can be found as the only data push in the ScriptSig:
{
  "version": "01000000",
  "inputcount": "01",
  "inputs": [
    {
      "txid": "9d7a3553c3faec3d88d18b36ec3bfcdf00c7639ea161205a02e7fc9a1a25b61d",
      "vout": "01000000",
      "scriptsigsize": "49",
      "scriptsig": "483045022100c219a522e65ca8500ebe05a70d5a49d840ccc15f2afa4ee9df783f06b2a322310220489a46c37feb33f52c586da25c70113b8eea41216440eb84771cb67a67fdb68c01",
      "sequence": "ffffffff"
    }
  ],
  "outputcount": "02",
  "outputs": [
    {
      "amount": "00f2052a01000000",
      "scriptpubkeysize": "19",
      "scriptpubkey": "76a914e32acf8e6718a32029dc395cca1e0ac45c33f14188ac"
    },
    {
      "amount": "00c817a804000000",
      "scriptpubkeysize": "43",
      "scriptpubkey": "41049464205950188c29d377eebca6535e0f3699ce4069ecd77ffebfbd0bcf95e3c134cb7d2742d800a12df41413a09ef87a80516353a2f0a280547bb5512dc03da8ac"
    }
  ],
  "locktime": "00000000"
}
Transaction: e827a366ad4fc9a305e0901fe1eefc7e9fb8d70655a079877cf1ead0c3618ec0
P2PKH
When unlocking a P2PKH, a single signature is found alongside the public key as the first data push in the ScriptSig:
0100000001a4e61ed60e66af9f7ca4f2eb25234f6e32e0cb8f6099db21a2462c42de61640b010000006b483045022100c233c3a8a510e03ad18b0a24694ef00c78101bfd5ac075b8c1037952ce26e91e02205aa5f8f88f29bb4ad5808ebc12abfd26bd791256f367b04c6d955f01f28a7724012103f0609c81a45f8cab67fc2d050c21b1acd3d37c7acfd54041be6601ab4cef4f31feffffff02f9243751130000001976a9140c443537e6e31f06e6edb2d4bb80f8481e2831ac88ac14206c00000000001976a914d807ded709af8893f02cdc30a37994429fa248ca88ac751a0600
{
  "version": "01000000",
  "inputcount": "01",
  "inputs": [
    {
      "txid": "a4e61ed60e66af9f7ca4f2eb25234f6e32e0cb8f6099db21a2462c42de61640b",
      "vout": "01000000",
      "scriptsigsize": "6b",
      "scriptsig": "483045022100c233c3a8a510e03ad18b0a24694ef00c78101bfd5ac075b8c1037952ce26e91e02205aa5f8f88f29bb4ad5808ebc12abfd26bd791256f367b04c6d955f01f28a7724012103f0609c81a45f8cab67fc2d050c21b1acd3d37c7acfd54041be6601ab4cef4f31",
      "sequence": "feffffff"
    }
  ],
  "outputcount": "02",
  "outputs": [
    {
      "amount": "f924375113000000",
      "scriptpubkeysize": "19",
      "scriptpubkey": "76a9140c443537e6e31f06e6edb2d4bb80f8481e2831ac88ac"
    },
    {
      "amount": "14206c0000000000",
      "scriptpubkeysize": "19",
      "scriptpubkey": "76a914d807ded709af8893f02cdc30a37994429fa248ca88ac"
    }
  ],
  "locktime": "751a0600"
}
Transaction: 40e331b67c0fe7750bb3b1943b378bf702dce86124dc12fa5980f975db7ec930
P2MS
When unlocking a P2MS, there will be one or more signatures in the ScriptSig.
This particular transaction is unlocking a 2-of-3 P2MS locking script, so the ScriptSig contains two signatures:
010000000110a5fee9786a9d2d72c25525e52dd70cbd9035d5152fac83b62d3aa7e2301d58000000009300483045022100af204ef91b8dba5884df50f87219ccef22014c21dd05aa44470d4ed800b7f6e40220428fe058684db1bb2bfb6061bff67048592c574effc217f0d150daedcf36787601483045022100e8547aa2c2a2761a5a28806d3ae0d1bbf0aeff782f9081dfea67b86cacb321340220771a166929469c34959daf726a2ac0c253f9aff391e58a3c7cb46d8b7e0fdc4801ffffffff0180a21900000000001976a914971802edf585cdbc4e57017d6e5142515c1e502888ac00000000
{
  "version": "01000000",
  "inputcount": "01",
  "inputs": [
    {
      "txid": "10a5fee9786a9d2d72c25525e52dd70cbd9035d5152fac83b62d3aa7e2301d58",
      "vout": "00000000",
      "scriptsigsize": "93",
      "scriptsig": "00483045022100af204ef91b8dba5884df50f87219ccef22014c21dd05aa44470d4ed800b7f6e40220428fe058684db1bb2bfb6061bff67048592c574effc217f0d150daedcf36787601483045022100e8547aa2c2a2761a5a28806d3ae0d1bbf0aeff782f9081dfea67b86cacb321340220771a166929469c34959daf726a2ac0c253f9aff391e58a3c7cb46d8b7e0fdc4801",
      "sequence": "ffffffff"
    }
  ],
  "outputcount": "01",
  "outputs": [
    {
      "amount": "80a2190000000000",
      "scriptpubkeysize": "19",
      "scriptpubkey": "76a914971802edf585cdbc4e57017d6e5142515c1e502888ac"
    }
  ],
  "locktime": "00000000"
}
Transaction: 949591ad468cef5c41656c0a502d9500671ee421fadb590fbc6373000039b693
P2WPKH
When unlocking a P2WPKH, the signature is found alongside the public key as the first item in the witness field.
020000000001013aa815ace3c5751ee6c325d614044ad58c18ed2858a44f9d9f98fbcddad878c10000000000ffffffff01344d10000000000016001430cd68883f558464ec7939d9f960956422018f0702483045022100c7fb3bd38bdceb315a28a0793d85f31e4e1d9983122b4a5de741d6ddca5caf8202207b2821abd7a1a2157a9d5e69d2fdba3502b0a96be809c34981f8445555bdafdb012103f465315805ed271eb972e43d84d2a9e19494d10151d9f6adb32b8534bfd764ab00000000
{
  "version": "02000000",
  "marker": "00",
  "flag": "01",
  "inputcount": "01",
  "inputs": [
    {
      "txid": "3aa815ace3c5751ee6c325d614044ad58c18ed2858a44f9d9f98fbcddad878c1",
      "vout": "00000000",
      "scriptsigsize": "00",
      "scriptsig": "",
      "sequence": "ffffffff"
    }
  ],
  "outputcount": "01",
  "outputs": [
    {
      "amount": "344d100000000000",
      "scriptpubkeysize": "16",
      "scriptpubkey": "001430cd68883f558464ec7939d9f960956422018f07"
    }
  ],
  "witness": [
    {
      "stackitems": "02",
      "0": {
        "size": "48",
        "item": "3045022100c7fb3bd38bdceb315a28a0793d85f31e4e1d9983122b4a5de741d6ddca5caf8202207b2821abd7a1a2157a9d5e69d2fdba3502b0a96be809c34981f8445555bdafdb01"
      },
      "1": {
        "size": "21",
        "item": "03f465315805ed271eb972e43d84d2a9e19494d10151d9f6adb32b8534bfd764ab"
      }
    }
  ],
  "locktime": "00000000"
}
Transaction: 1674761a2b5cb6c7ea39ef58483433e8735e732f5d5815c9ef90523a91ed34a6
A P2WPKH works in the same way as a P2PKH, but uses the Witness field for unlocking the input instead of the ScriptSig.
P2TR
When unlocking a P2TR output via the default key path spend method, the signature is the only item in the witness field.
02000000000101ec9016580d98a93909faf9d2f431e74f781b438d81372bb6aab4db67725c11a70000000000ffffffff0110270000000000001600144e44ca792ce545acba99d41304460dd1f53be3840141b693a0797b24bae12ed0516a2f5ba765618dca89b75e498ba5b745b71644362298a45ca39230d10a02ee6290a91cebf9839600f7e35158a447ea182ea0e022ae0100000000
{
  "version": "02000000",
  "marker": "00",
  "flag": "01",
  "inputcount": "01",
  "inputs": [
    {
      "txid": "ec9016580d98a93909faf9d2f431e74f781b438d81372bb6aab4db67725c11a7",
      "vout": "00000000",
      "scriptsigsize": "00",
      "scriptsig": "",
      "sequence": "ffffffff"
    }
  ],
  "outputcount": "01",
  "outputs": [
    {
      "amount": "1027000000000000",
      "scriptpubkeysize": "16",
      "scriptpubkey": "00144e44ca792ce545acba99d41304460dd1f53be384"
    }
  ],
  "witness": [
    {
      "stackitems": "01",
      "0": {
        "size": "41",
        "item": "b693a0797b24bae12ed0516a2f5ba765618dca89b75e498ba5b745b71644362298a45ca39230d10a02ee6290a91cebf9839600f7e35158a447ea182ea0e022ae01"
      }
    }
  ],
  "locktime": "00000000"
}
Transaction: 091d2aaadc409298fd8353a4cd94c319481a0b4623fb00872fe240448e93fcbe
Signatures in P2TR do not use DER encoding. This is why the signature in this transaction is a little shorter and looks a little different (i.e. doesn't start with 30450221) compared to the other signatures.
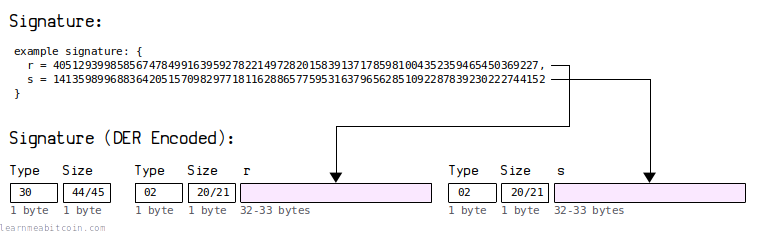
DER Encoding
A DER-encoded signature in Bitcoin typically starts with 3044 or 3045, and is usually 70 or 71 bytes in length.
All ECDSA signatures in Bitcoin use DER encoding.
DER is an acronym for "Distinguished Encoding Rules". It's typically used for encoding cryptographic data structures (e.g. signatures) in a specific format so that they can be shared more easily between computers.
Anyway, a DER encoded signature is basically just the r and s values converted to 32-byte hexadecimal values, along with some extra "type" and "length" bytes between them. There is also a Bitcoin-specific quirk where if first byte of the r or s value is 80 or above, you have to prepend a 00 byte to it.
Due to the fact we always take the "low" s value for the signature, you will never normally need to prepend a 00 byte to it. However, this is just a standardness rule, so it's still technically possible for a "high" s value to be mined, which could take a DER-encoded signature up to 72 bytes in total.
The "type" bytes of 30 and 02 are always the same. So it's only the "length", r, and s values that actually change within a DER-encoded signature.
History
The choice of DER-encoding for signatures is a bit pointless, as it's not used for encoding any other type of data structure in Bitcoin, so it just adds unnecessary bytes of data for no actual benefit.
Nonetheless, it's what Satoshi used when they first designed Bitcoin, so now we have to use it to encode all ECDSA signatures. So if you're unlocking a legacy output like P2PK, P2PKH, P2MS, or P2SH, or a segwit output like P2WPKH or P2WSH, your signatures need to be DER encoded.
My guess is that Satoshi did not know about the internals of ECDSA signatures, and simply used what OpenSSL gave him. If it didn't require a hard forking change (requiring every wallet and verifying node on the network to upgrade), we'd have changed it long ago.
However, with the introduction of Schnorr signatures in the Taproot upgrade it was decided to no longer use DER encoding, so signatures in P2TR are not DER encoded.
ECDSA signatures use DER encoding. Schnorr signatures do not.
Signature Hash Type
A signature hash type (sighash) is used to signify which parts of the transaction have been signed.
Signature Hash Types:

0x01 = SIGHASH_ALL
0x02 = SIGHASH_NONE
0x03 = SIGHASH_SINGLE
0x81 = SIGHASH_ANYONECANPAY | SIGHASH_ALL
0x82 = SIGHASH_ANYONECANPAY | SIGHASH_NONE
0x83 = SIGHASH_ANYONECANPAY | SIGHASH_SINGLE
A 1-byte signature hash type gets appended to every DER encoded signature before being used in a transaction. For example, if we look at this signature:
3045022100c219a522e65ca8500ebe05a70d5a49d840ccc15f2afa4ee9df783f06b2a322310220489a46c37feb33f52c586da25c70113b8eea41216440eb84771cb67a67fdb68c01We can see that it ends with a 01, which corresponds to the sighash type SIGHASH_ALL.
A 1-byte sighash type is added to the end of every DER-encoded signature. A 4-byte sighash type is also added to the end of the transaction data before you sign it (see legacy algorithm step 8 and segwit algorithm step 5).
It's possible to use the different sighash types to only sign certain parts of the transaction, which means that inputs and/or outputs can be added to the transaction after you've signed it.
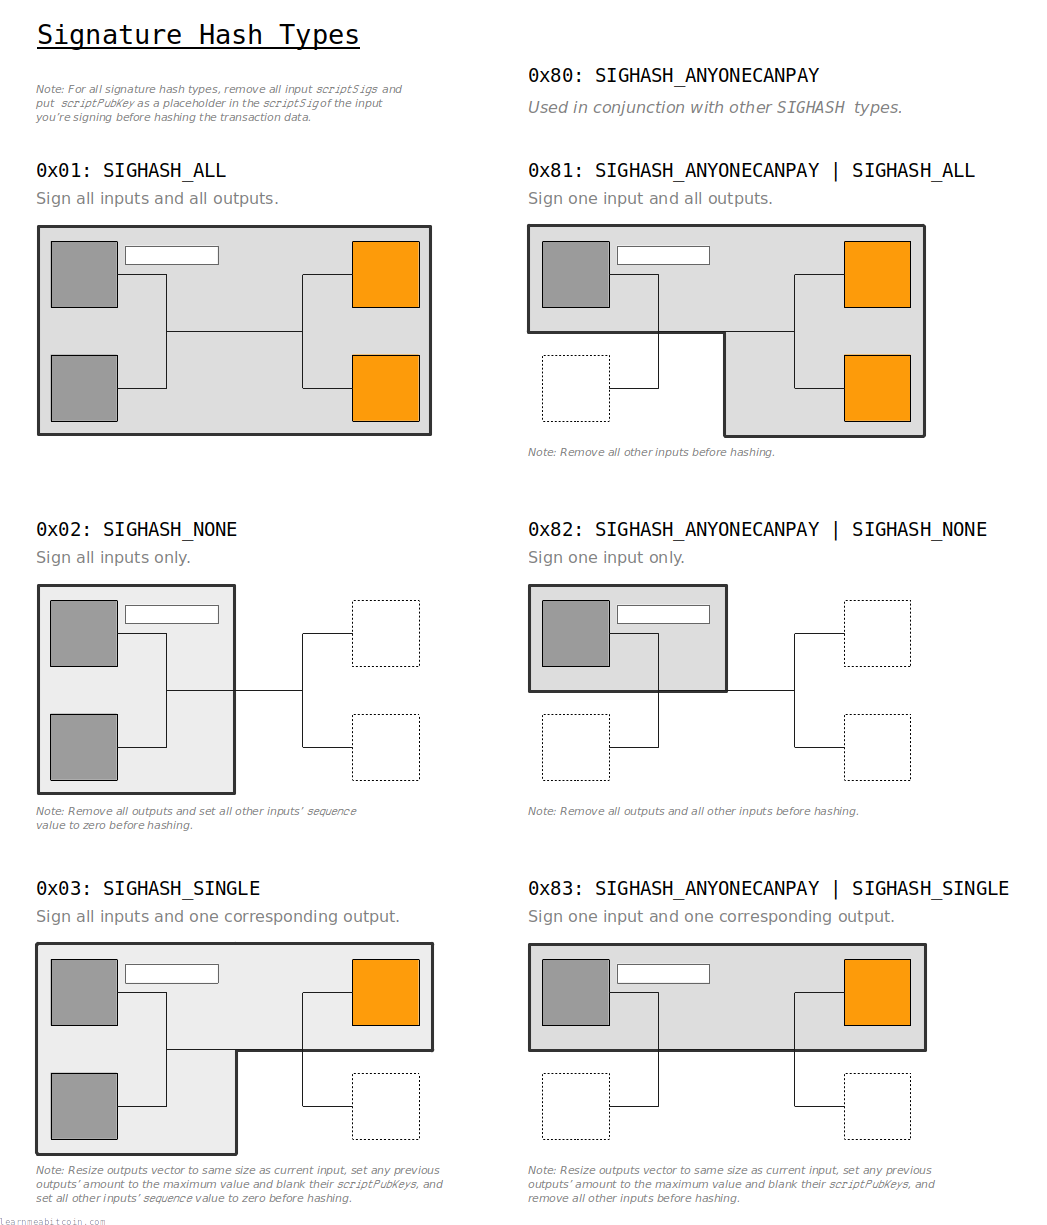
For example, you usually use SIGHASH_ALL (0x01) to indicate that your signature applies to the whole transaction. This means that no part of the transaction can be modified or else the signature will be invalid (and so will the transaction). This is what you normally want, because you usually don't want anyone to change anything about the transaction you've signed.
However, if you sign a transaction using SIGHASH_NONE (0x02), this means that anyone can add extra outputs to the transaction later on (before it gets mined into a block), and the signature and transaction will still be valid.
If you don't know what signature hash type to use, stick with SIGHASH_ALL (0x01). This is the default signature hash type used by wallets, and it protects the entire transaction from being modified.
Certain signature hash types must be used in conjunction with removing the specific parts of the transaction that you don't want to sign when creating the signature. So don't forget to prepare the raw transaction accordingly for your chosen sighash type before you sign it.
Summary
Signing a transaction is the most complicated part of working with Bitcoin.
To start with, you've got to get to grips the mathematics involved in creating a signature. After that, you've got to figure how to prepare the raw transaction data ready for signing. And if you get just one of the steps in the process even slightly wrong, the signature will be invalid.
But it is doable.
The trick is to take the process one step at a time. If you try and code the signing algorithm all in one go you're more likely to make mistakes, and it will be hard to figure out where you've gone wrong and what you need to do to fix it.
And trust me, you're going to make mistakes.
But if you break it down in to steps and make sure your results are lining up at each step of the way, you'll get there eventually. And once you've got the algorithm working, you can create as many signatures as you want, because once you've got it working once, it's working forever.
So don't let the seemingly complex process put you off. Whilst signing a transaction is hard work the first time around, it's also incredibly satisfying. And if you can achieve it, you'll be part of a very small club that has managed to successfully sign their own bitcoin transaction from scratch.
Because ultimately there are two categories of Bitcoin programmer; those who have signed their own transaction, and those who haven't.
Good luck.
Resources
- bitcoin.it/wiki/OP_CHECKSIG – How to prepare transaction data for hashing when using the different
SIGHASHtypes. - Bitcoin's Signature Types – Clear explanation of the different signature hash types available in Bitcoin
- What is the maximum size of a DER encoded ECDSA signature?
- Why are SIGHASH flags signed as 4 bytes when only 1 byte is included in the transaction?